The sand and barrows are back!
The sand to blind the bottom of the excavation was delivered, and tipped just next to the excavation. With hind site, we realised we should have asked for the sand to be delivered on a grab lorry. This would have been able to put the sand in the excavation for us. Sadly this thought occurred too late and yet another scaffold path was put together to navigate the barrows over the masonry and into the hole!
We cleared out the bottom of the excavation and removed all the formwork from the inside of the lime mortar levelling bed. This has now had almost 2 weeks since it was laid, and it hardening up nicely. We left the formwork on the outside of the masonry to help protect it while we continue the site work.
Day 40
Not much has happened on site this week - we are really just waiting for the lime to dry out enough to cast the limecrete slab. Our sign arrived today, which we will put up this weekend. We also had yet another delivery of sand to put in the bottom of the excavation. The point of this is to prevent the chalk excavation from getting really claggy if it rains while we are putting the LECA in. Hopefully though the weather will stay warm and sunny! Its also good drying conditions for the lime.
Day 33 - first phase blockwork complete
... so we went round and removed it all both inside and outside of the cavity.
It's important to try and avoid the waste mortar that has fallen while putting up the masonry (snots) from bridging the damp proof course, which in this instance is above the red engineering bricks...
All phase 1 blockwork is now complete. The blockwork will now be left to dry until we fill it with LECA insulation in the last weekend in May, ready to lay the limecrete slab on 1st June.
Starting the final day of phase 1 blockwork (up to slab level).
Day 32
The blockwork projecting arms. The last block on the lowest course is orientated in the opposite direction. This provides a sort of pad beneath the truss post above that it will be supporting, giving it an extra bit of stability.
On the west elevation we have an external truss which is supported on cedar posts. The posts are fixed to the blockwork. This blockwork is connected back to the main blockwork, and bonded in to the 9" outer leaf.
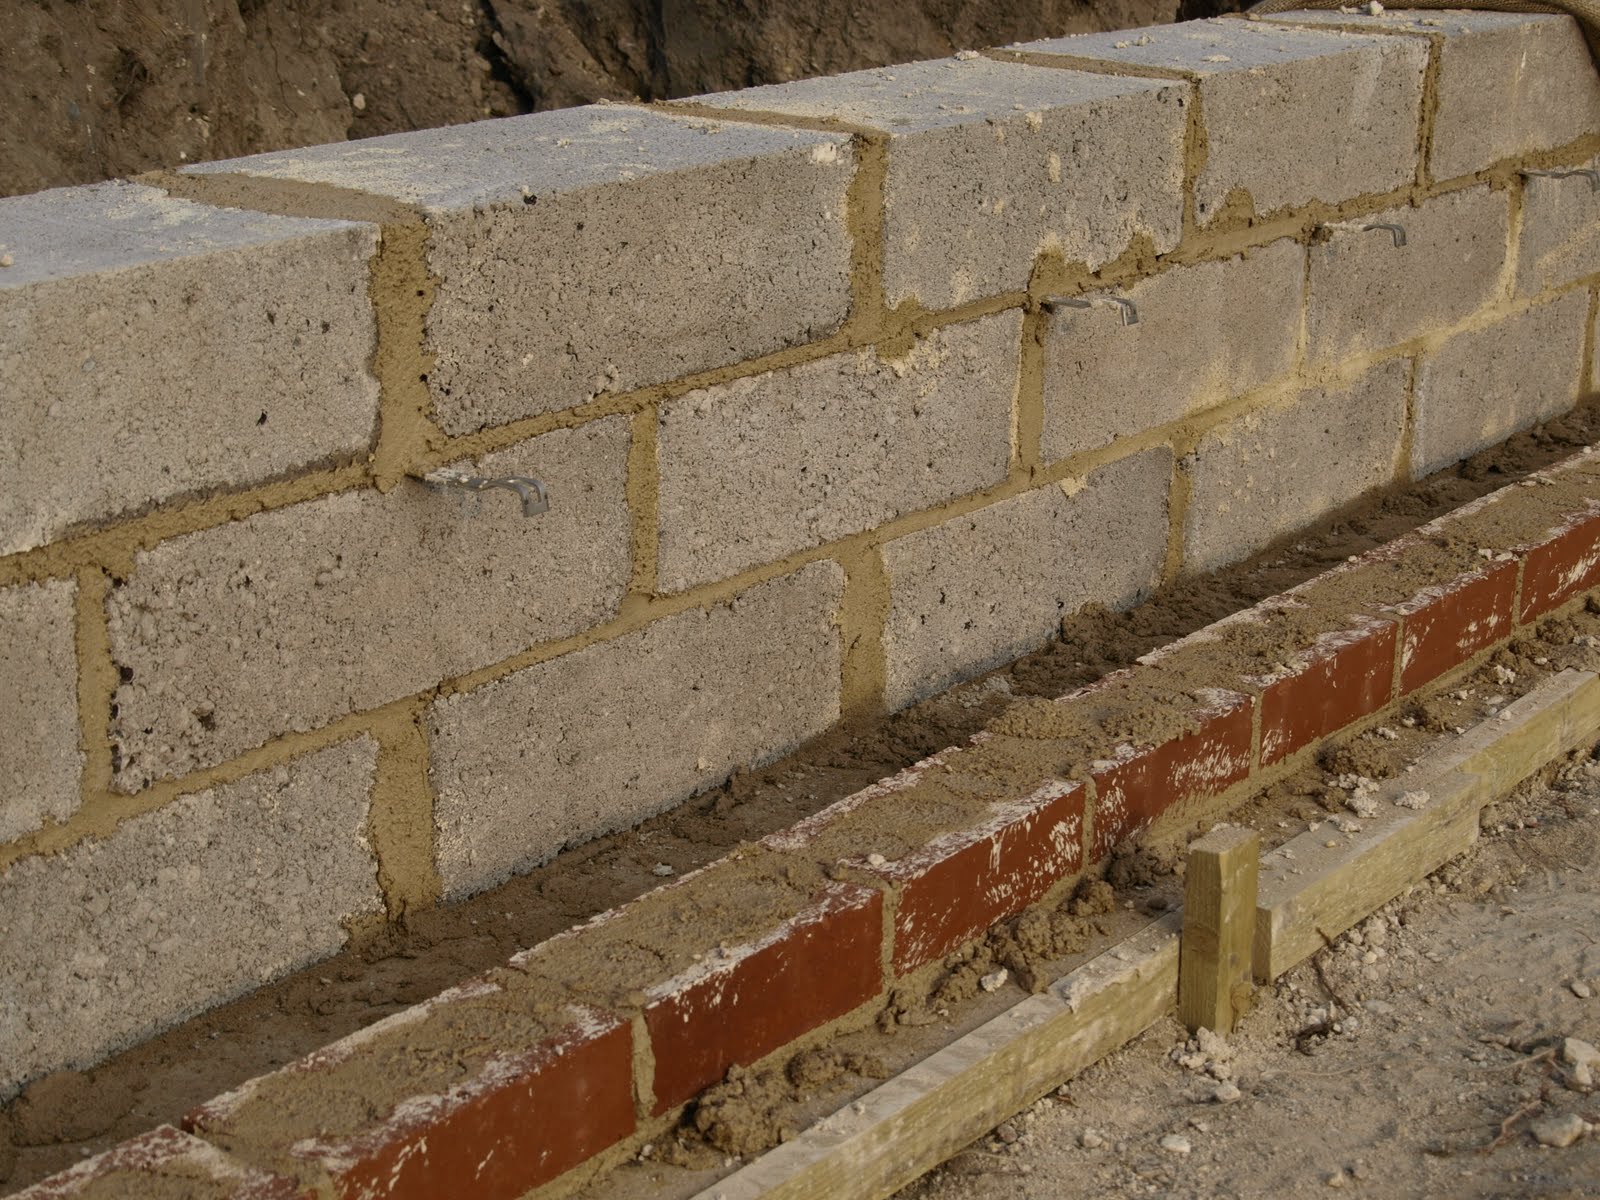
I thought this showed the build up of the wall quite well. The outer leaf on the right is 140mm blocks laid flat, with cavity ties in the second bed joint (along with hidden bricktor bed joint reinforcement). The inner leaf starts with an engineering brick, with dpc laid over the top (to prevent any rising damp), 100mm block, Bricktor SB40 W60 and wall ties, second 100mm block.
There is no dpc in the outer leaf of the wall as there will be ground backfilled against this. Any moisture that gets though the external leaf into the cavity will drain out through the LECA, which will protect the inner leaf from getting damp. On the inside of the inner leaf, will be more LECA which will form part of the build up of the Ty Mawr limecrete floor system. LECA prevents damp from rising, so will protect the other side of the inner leaf (and the limecrete slab) from getting damp. The inner leaf was therefore only vulnerable to rising damp from the ground below, hence the dpc on top of the engineering bricks. We also did not want to create a path for moisture to migrate up into the limecrete slab, by bypassing the LECA and making its way up through the inner leaf of blockwork.
The two halves of the cavity ties clipped together.
As we have a large cavity (about 180mm), standard wall ties would not be long enough. We are using Ancon 2 part stainless steel ties. These come in two parts, which clip together. The advantage of having them in two parts is that you are not left with a huge tie hanging out of the wall after you have built up one leaf and are building up the other leaf. It also makes them slightly easier to position because the bit hanging out of the masonry is not as heavy.
All three courses of the blocks built up on the external leaf, and the brick course laid on the inner leaf. The brickwork is a levelling course, which will ensure the inner leaf courses with the top of the limecrete slab.
Day 31 - Starting the blockwork
On top of the second course of blocks laid flat we have a continuous layer of bed joint reinforcement. This is a stainless steel wire grid, which helps to spread the load evenly over the blockwork and ground bearing. It will reinforce the blockwork and ensure we don't get uneven settlement where we had to dig out some areas of the excavation deeper to reach solid ground and build the level back up with a fill material.
We took advice about the cracks we noticed in the lime mortar bed yesterday. We were told that the shallower cracks can be smoothed out with a trowel. The deeper cracks can be very lightly damped down and then smoothed out. We carried this out before we started building up the blocks. The mortar could have cracked for a number of reasons: it could have been because the mix was too wet when it was laid, this will lead to excessive shrinkage (visible in the sign of cracks); or it could have dried out too quickly due to the warm weather and would have benefitted from being wet down to keep it moist for longer.
Almost the entire outer leaf was built up to two blocks high today. The mortar bed is now much harder, we have been protecting it from frosts completely covering it every night.
Originally we were proposing to use NHL 3.5 lime mortar, with a mix of 1 (lime) : 2 (sharp sand). However, we were advised to use NHL 5 for all the below ground work, particularly as we were using it to bed concrete blocks (which are very hard). The idea is that your mortar should always be softer than the material it is bedding. The other advantage of using NHL 5 rather than 3.5 is that it sets a lot faster. This means it should be sufficiently dry before we lay the limecrete slab in the first week in June. The mix we are using with the NHL5 is 1 (lime) : 2.5 (well graded sharp sand). With naturally hydraulic lime the sharp sand should be 3mm down, if we were using a lime putty we could use a courser sand.
Apparently last night it was the coldest night in May for about 14 years! I have now had to de-ice my windscreen two mornings in a row. We never thought we would be having problems with frost when starting out lime work in almost the middle of May.
Lime mortar bed (shown in blue) is laid. First phase of blockwork begins today, up to slab level (shown in red).
Day 30
While the mortar was drying, we made some more progress on the drainage and services. The drainage and water pipe trenching is now complete and just need to be connected to the existing services.
The bed covered with the hessian.
We are expecting another frost tonight, so are covering the mortar bed with hessian.
The mortar bed does not seem to be any harder than it was yesterday evening. It is set but can be indented with a finger print if pressed firmly. We were worried about starting the lay the blocks tomorrow, that the weight of them would squash the mortar bed. We did pile a few blocks on top of it to test it and it seemed ok.
From looking at the weep holes, it looks like the cracks go all the way through the bed.
We still have the circular cut outs of mortar, and we were concerned that when we crushed a couple of these they easily turned to a sandy pile.
Unfortunately last night the air temperature dropped to about 2 degrees and we experienced a ground frost. To be honest we had not been expecting this as we are approaching the middle of May. Lime mortar needs to be protected from frost and should only be laid when the temperature is 3 degrees and rising.
This evening we noticed cracks starting to open up in the mortar bed, which we are a bit concerned about and will keep a close eye on.
Day 29 - Lime mortar levelling course
The cavity between the two leaves of masonry will be filled with LECA (lightweight expanded clay aggregate) which is both an insulation and a free draining material. Any moisture that gets into the cavity will drain down through the cavity. The LECA does not hold moisture or wick moisture up. In the bottom of the cavity we therefore needed to make provision to get rid of any water that drained through the LECA.
Originally we had planned to insert short sections of pipe approx 150mm diameter into the ground at 1metre centres, the top of which would be flush with the top of the lime mortar. This would allow the lime mortar to be cast around the pipes. However, given the hardness of the chalk ground we decided that it was just not possible to get the pipes in the ground without compromising the chalk bearing around the pipes. The only way to break out the chalk is to pickaxe the ground and this is not very precise or accurate.
Instead, we used a piece of plastic pipe to cut holes out of the mortar once it was cast. The sections generally came out quite well and we then just went round with a gardening trowel and cleaned out the bottom of the holes.
The lime we are using is Singleton Birch NHL 5-Z, which is made in this county. We were choosing between this and the French made St Astier Lime. From what we have learned the St Astier lime has a greater compressive strength than the Singleton Birch and has a faster set. Roughly speaking the St Astier NHL3.5 is comparable to the Singleton Birch NHL5. This is because it is harder in this country to made a true NHL5. On the other hand, the Singleton Birch bulks up better, and produces a fatter, creamer mix. This makes is better suited to mortars.
Castle lime, which we will be using in the limecrete slab, comes from a similar region in France to St Astier lime and is better suited to things like limecrete slabs, where the greater thickness benefits from a lime with a faster set.
The lime mortar cast within the formwork was completed today as planned. It was thicker than we had hoped in places. Ideally we were trying to keep it to a minimum, just sufficient to provide a level base to begin the masonry from. We were aiming for less than 50mm but generally it seems to be between 50-100mm.
We wanted to backfill around the concrete lintels with spoil first before applying the limecrete bed to avoid the lime mortar becoming thicker here. However, the mortar does seem to be a bit thicker.
The problem with the mortar becoming too thick is that it will increase the drying time and we were hoping to start laying the first phase of masonry after about 36hours in order to stay on programme.
We are using NHL 5 lime mortar, with a mix of 1 (lime) : 2.5 (sharp sand). The sand needs to be well graded, and include a good range of all grain sizes from large to very small. This will give the mortar good strength. The sand we are using is from Whitton Frost in Bury and includes grain sizes from 4mm down.
Day 28 - foundation formwork
Eventually we made it all the way round. The pegs were really difficult to get into the ground because the chalk is so hard, and had to be chiseled out with a cold chisel first before attempting to bang the timber peg in.
The weather was thankfully much better today!
It was really time consuming to get the formwork level and involved reducing the ground level in places (with a pick axe) and building it up in others. We managed to get this within 5mm tolerance.
To cast the lime mortar levelling bed to a constant level we constructed timber shuttering to a constant level. A simple gauge enabled us to get the sides correctly positioned relative to the grid lines.
Day 27
Once we had set out all the corners of the grid in the excavation we needed to move all the blocks into the middle to allow us to set up the string lines.
Setting the first concrete lintel on sand. By bedding it on sand we could accurately adjust the level until it was correct.
Where we have services entering and leaving the building we decided it was easier if they passed under the foundations rather than trying to take them through them. As there were only three of them, we used pre-cast concrete lintels to span over the trenches and support the masonry above. The planks were supported by the chalk ground and had a 300mm bearing either side. This was quick and easy.
The grid marked out in the excavated hole!
The weather was miserable all day today. It was relentless rain, which made everything soggy, wet and very muddy!
We tried out a 30metre steel tape (which was a very thin gauge) to set out rather than a fabric one. We were curious to compare how much give there was in the fabric tapes compared to a steel one. However with all the mud it got very gritty and stiff as it was continually unwound and wound back up. Probably not the best day for its debut. Hopefully, it will recover and make it through to see another day!
First task of the day was finishing off setting out the grid. Strings marked out the grid at ground level (at the top in the picture). Then we needed to plumb down from the intersections on the string grid to give us the corresponding points in the excavated hole.
The chalk is so hard, 3/8 timber posts split while we were trying to bang them into it!
Day 26
The proposed location of the soil vent pipes are shown in red.
The last two svps are put in. The one in the front will be a stub stack serve the downstairs WC and the utility room; the one behind will be a soil vent pipe serving the main bathroom upstairs. These both join the main drainage run to the south of the building.
Day 25
These are our recycled concrete blocks. They are heavy - about 20kg for the 140mm width and about 14kg for the 100mm width. Ideally we wanted to use all clay bricks rather than concrete blocks, but as they are much smaller units they are more expensive to lay and more expensive to buy.
The first drain run is complete! This will connect to the soil vent pipe (svp) which will take the waste from the kitchen and the ensuite bathroom above. In total there are 3 svps, so two more to go. They all head to the south of the proposed new house where they run alongside the existing bungalow and join into the existing drainage.
The interconnecting rings.
The base of the first inspection chamber (manhole). The height of this is then built up using rings which stack on top of each other and lock together, up to the level we want the cover at.
Our masonry foundations built off the chalk / sandy excavated ground. (We have a few tweaks to make to the details of the straw in this drawing, which we will update shortly).
Day 24 - Starting the drainage
The first drainage run has been excavated, and bottom of the first inspection chamber put in place.
The drainage runs have been confined to the south side of the house, due to the extensive ground source heat pump loops on the north and east sides. The public sewer runs just beyond the site boundary along the road, and has an invert depth of just under 6 metres. We are connecting into the existing drainage used by the bungalow (because by the time we use the new drainage we will have demolished the existing drainage, so there will be no net increase). This avoids us having to dig down about 6 metres to connect into the public sewer.
Day 23
The recycled concrete blocks arrived for the first part of the masonry foundations below ground level. These 'Masterblock Enviroblock' blocks boast a recycled content of a minimum of 80%, which was the highest percentage we could find. It would be interesting to know if anyone knows of one with a higher content...
Ideally we wanted them located in the centre of the excavation, however the reach on the crane was not sufficient. This was as far as they could get the blocks.
This was the other soft spot. A perfectly circular hole! Our best guess was a pole of some description.
Both the soft spots were dug out and filled with well compacted 20mm limestone.
We went over the whole footprint to check it was a firm base for our masonry, as we are not using concrete footings. It was all rock hard apart from two very localised mystery soft spots. These had to be dug out as they would not have provided a good bearing for our foundation walls.
This was the first - it was over two meters below finished ground level before we reached solid ground and it turned out to be a dogs grave (complete with a pile of bones!).
Day 22 - setting out the grid
We planned to set up timber bridges at a constant level, at each end of all grid lines. These bridges were located using rough setting out marked with the tent pegs. Accurate setting out of the grid was marked with nails in the top of each bridge, between which we could tie string to get a constant grid line.
We decided there were some areas we could not set out the grid today, as they needed further excavation. The timber bridges would have been in the way here. (And predictably it all took longer than expected so we also ran out of time!)
We ended up spraying our markers (tent pegs!) to make them more visible!
We planned to set out the main building grid today, so that we could set out the drainage ahead of it being dug on Tuesday.
Day 20
The excavated base is a mix of chalk and gravelly firm sand containing flint gravel with chalk lines. It was not quite the continuous bed of chalk we were hoping for! The main chalk area was in the back right corner of the photo.
In the front right corner the topsoil was much deeper than elsewhere (towards the back there is as little as 100mm in places), and was still present at the final excavated level. We think that the chalk is about 100mm below this level, so we will need to dig down further and build the level back up.