All the geotextile laid. Now we wait until Tuesday to lay the limecrete.
Day 49 - Laying the LECA (part 2)
The last 3 days in 30 seconds!
Carefully holding it down against the wind without rucking the LECA up!
Last job was to lay another sheet of geotextile membrane over the top. Breezy conditions made this quite a challenge! We could not walk on the LECA at this point, unless on scaffold boards.
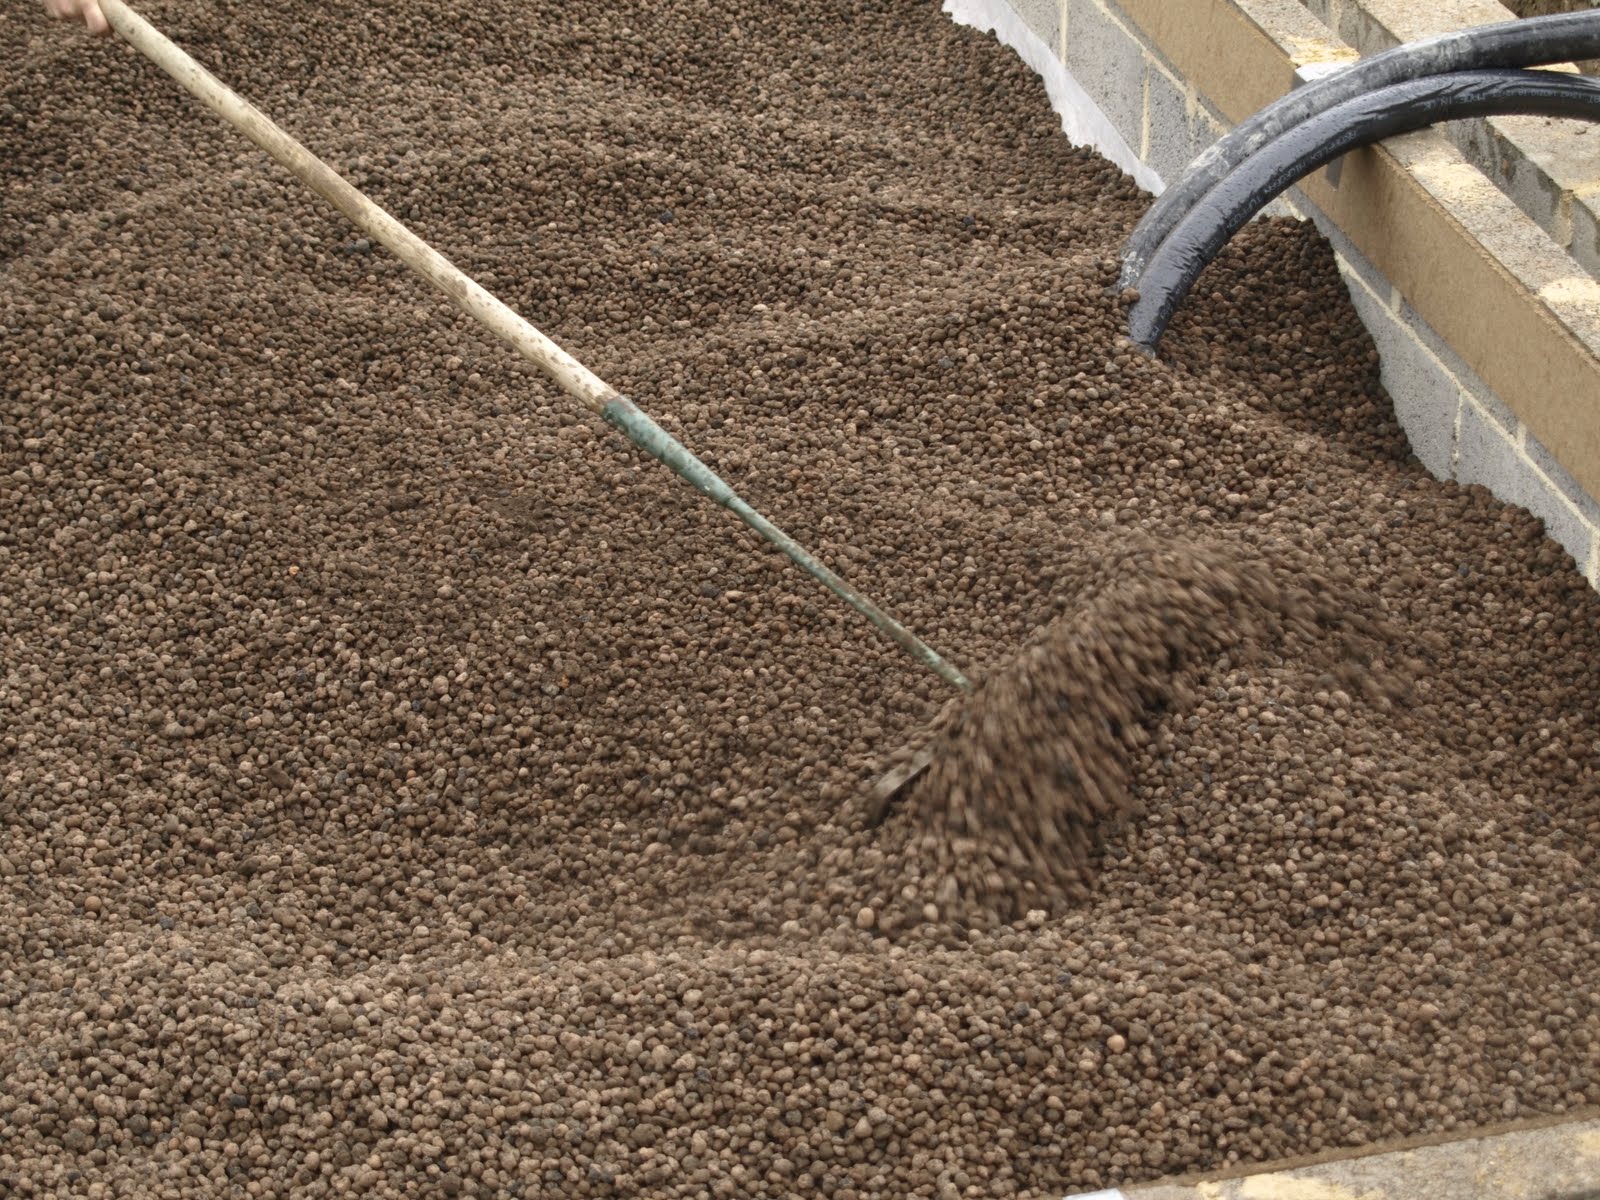
The levelling and compaction process!
It seems that you need to allow plenty of extra LECA, because an extra 5-6 cubic metres (12-15%) went into the base than we were anticipating. Our internal ground floor area is 95sqm, with the LECA laid to 365mm deep. That equates to 36 cubic metres, so allowing for compaction etc we expected to use 39 cubic metre bags as ordered. We actually ended up using 44.5 cubic metre bags. Luckily we had ordered extra to fill the cavity which we could use instead. We will now need to re-order more for the cavity.
The LECA before and after compacting. It is important to get a consistent level otherwise you could end up with the limecrete slab being thicker in some areas than in others.
Scaffold boards were then laid over the levelled LECA, and finally compacted using a sledge hammer or hand compactor. If we had used a wacker plate, we would have been at risk of crushing the LECA to dust.
Low spots were topped up using an old dustbin!
A combination of rakes and shovels were used to fine tune the level of the LECA. We worked our way down the footprint, moving the levelling beam along the footprint in 1/2 metre intervals.
The levelling beam was placed over the footprint to give us a constant level. The limecrete will be 150mm thick, so we wanted the top of the LECA to be between 130-140mm down from the levelling beam at this stage, before the final compaction (which would reduce the level).
After raking it roughly level we tamped it down with our feet to lightly compact it. Similar to if you were preparing the ground before laying turf.
The telehandler made getting the LECA into the footprint much easier. It would have taken at least five times as long without it! We tried to save about 8 of the cubic metre bags, and even using the telehandler to drop the bag into the footprint, it was incredibly difficult to empty the contents. Each bag weighed about 300kg. It was almost impossible to move by hand, even with several pairs.
We finished off getting the LECA into the footprint. Here you can see the sand blinding, geotextile membrane and LECA build up. Underneath all of this is solid chalk.
Day 48 - Laying the LECA (part 1)
The LECA in the cavity and in the footprint.
...and let the LECA pour in!
The telehandler suspended the metre cube bags of LECA over the footprint. We then cut the bottom of the bag open with a knife...
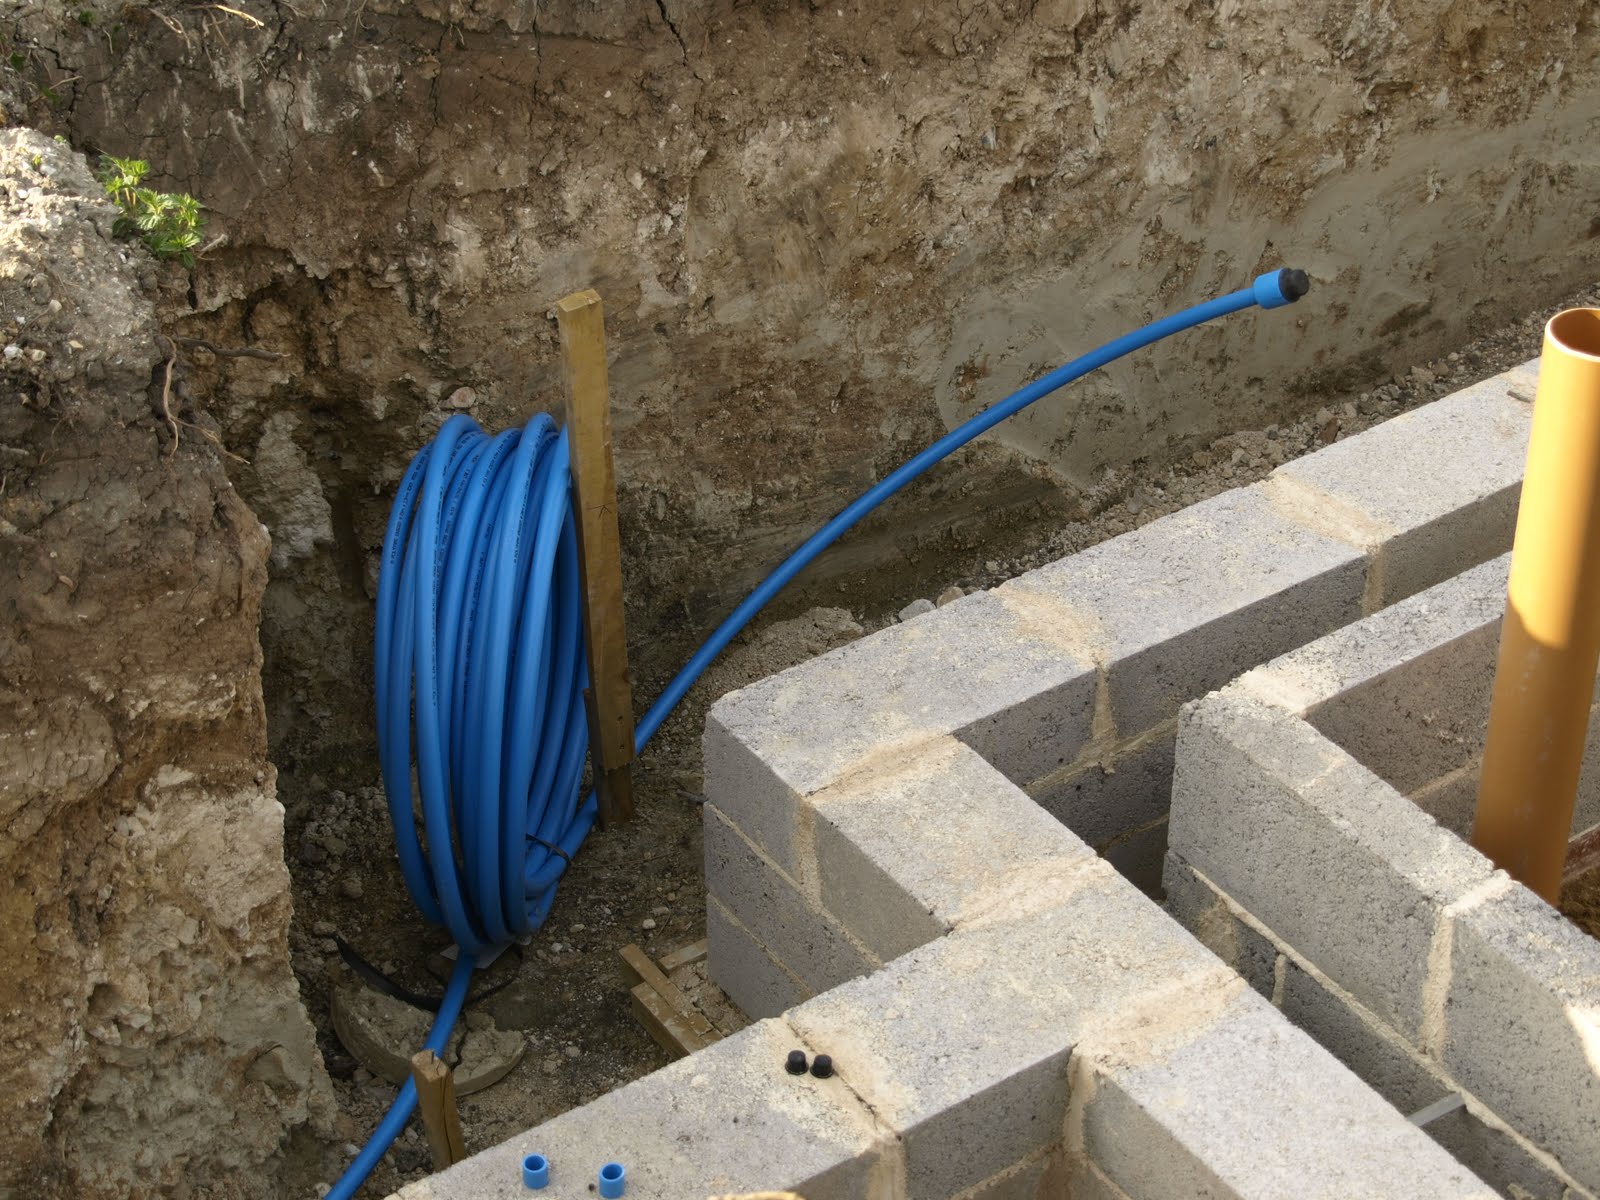
The geotextile membrane. This is a permeable fabric used to contain the LECA and which allows moisture to drain through it. It prevents anything migrating up into the LECA zone, which may inhibit its anti-wicking properties.
On top of the chalk (and sand blinding) is laid a geotextile membrane. This had to be cut round all the penetrations coming through the floor (like drainage and services).
This is the LECA (Lightweight Expanded Clay Aggregate). It is formed by firing liquid droplets of clay into a 1000 degree C kiln, which causes the liquid to turn to steam expanding the clay into "malteser" type of fired clay balls. The balls are honeycombed and easily crushed. An alternative to this is 'recycled foam glass' which looks like crushed concrete blocks. We would have liked to use this product as it was recycled but it was going to work out about double the cost - £145 a cubic metre rather than £75.
LECA or Recycled Foam Glass act as both the damp proof membrane and the insulation for the floor. They both prevent moisture from being wicked up from the ground below and they allow moisture to drain through. This is a critical part of the breathing floor concept and different to common current practice, which relies on a damp proof membrane (quite often a polythene sheet) blocking moisture from being drawn up into the floor. However, this does not allow any moisture to get out either. Foam glass or LECA above 120mm in thickness is certified to resist the wicking of moisture. It is also insulating but does require a reasonable depth to give you an acceptable U-Value. We have 380mm and this is achieving a U-Value of 0.2W/m2/K, which is not exceptional (although the U-Value required to meet Building Regulation is now worked out wholistically, a value of 0.25W/m2/K would be acceptable for a ground floor). Ideally we would have like to have bettered 0.2W/m2/K (the lower the number the better).
There is a new product, Hempcrete, which we have been told about by the Limecrete Company which is an alternative to Limecrete but can achieve much better U-Values. We will investigate more about this!
The cavity partly filled with LECA.
... the rectangular ducting was connected with a 90 degrees elbow to a 100mm circular ventilation duct. This looks a bit of a mess in the photo as it is covered in insulation and then protected from the rain with carrier bags and tape! If rain were to get into the duct there is no way out for it. It rained a lot today!
...we connected the periscope vent to a rectangular section of ventilation ducting, which we took through the brickcourse in the inner leaf under the dpc...
Our next task was to install the external air supply for the woodburner. A lot of the new Scandanavian woodburners come with a dedicated spigot to connect an air supply directly into the back of the woodburner, this avoids the need for a grill in the wall which would let out heat and may be drafty.
We wanted to take the external air supply under the limecrete slab, so we fitted a periscope ventilator in the cavity of the wall, which will fit behind an airbrick...
First job of the day was fixing the expansion board (made of wood fibre) to the inside of the blockwork. It was fixed so the top was level with the top of the inner leaf of blocks, which will be the level to the top of the limcrete slab. The boards were 150mm deep, the same as the depth of the limecrete.
Day 47 - Limecrete materials & telehandler delivered
The Lightweight Limecrete Aggregate (0-15mm) - 16 cubic metres delivered.
All unloaded - 46 cubic metres of LECA, 16 cubic metres of Limecrete Aggragate, 164 bays of lime and a roll of geotextile!
 ...genius!
The crane on the 14 tonne lorry then started to offload the artic...
The first load off the 14tonne lorry.
The materials delivered: Loosefill insulating aggregate (LECA) 10-20mm; Lightweight limecrete aggregate 0-15mm; castle hydraulic lime NHL5; Geotextile membrane.
The delivery of materials for the limecrete slab has arrived on one artic and one 14tonne flat bed. They both fitted on the site and parked up side by side.
Day 46 - More on the drainage and water supply
We put the pipe in for the new external tap which will be in the centre of the garden, while we had the trenches around the building still open. We connected this to the new pipe and will leave this coiled up until we dig the final part of the trench to the proposed location of the tap. Water pipe should be a minimum of 750mm deep to prevent it from freezing when the weather is cold.
We will need to take this pipe over the ground source loop to get to the proposed location of the tap. Where it will be within a metre of the ground source pipe will will need to insulate it to prevent it from freezing.
We also made the connection to the existing water pipe. It was quite complicated attaching the modern sized compression tee to the old steel pipe.
You can also see our existing electricity supply cable in the foreground, which was not very deep at all.
The last manhole, which connects to the existing drain (on the left). The drains are now ready for testing for leaks. We will put a bungs in and fill each section with water. When the whole system is full of water, it will be left for about hour to make sure the level doesn't drop (building control also visit to inspect this). The bungs are then removed to check it all drains.
A drainage and services barrow, ready for action!
It was very hot, and progress was slow! Probably about 1/3 complete - keep going...
The sand deposits in the excavation waiting to be levelled.
The sand and barrows are back!
The sand to blind the bottom of the excavation was delivered, and tipped just next to the excavation. With hind site, we realised we should have asked for the sand to be delivered on a grab lorry. This would have been able to put the sand in the excavation for us. Sadly this thought occurred too late and yet another scaffold path was put together to navigate the barrows over the masonry and into the hole!
We cleared out the bottom of the excavation and removed all the formwork from the inside of the lime mortar levelling bed. This has now had almost 2 weeks since it was laid, and it hardening up nicely. We left the formwork on the outside of the masonry to help protect it while we continue the site work.
Day 40
Not much has happened on site this week - we are really just waiting for the lime to dry out enough to cast the limecrete slab. Our sign arrived today, which we will put up this weekend. We also had yet another delivery of sand to put in the bottom of the excavation. The point of this is to prevent the chalk excavation from getting really claggy if it rains while we are putting the LECA in. Hopefully though the weather will stay warm and sunny! Its also good drying conditions for the lime.
Day 33 - first phase blockwork complete
... so we went round and removed it all both inside and outside of the cavity.
It's important to try and avoid the waste mortar that has fallen while putting up the masonry (snots) from bridging the damp proof course, which in this instance is above the red engineering bricks...
All phase 1 blockwork is now complete. The blockwork will now be left to dry until we fill it with LECA insulation in the last weekend in May, ready to lay the limecrete slab on 1st June.